Author: Jo Ann
Luv'N Chins
Hints for a Good On-Line Chinchilla Show Photo
Photography can be tricky and taking a picture of a chinchilla can be challenging! Some very basic rules apply for getting a great picture.
Preparation:
1. Try to have 1 or 2 people to help you. (Chins move quickly and we do not want accidents.)
2. A white sheet, blanket, or material works great.
Hint: If you are using a new sheet cotton or cotton/polyester blend ... wash it first to remove the 'stay' or shiny finish of the material ... it will reflect the light.
3. If you can do it on a bright sun-shiny day near a window using the natural lighting of the sun, you will get much better results. Hint: Have the window to your back while shooting photos, so that the sun can shine in on your chin.
4. A 'light-box' will help keep the chin 'confined', give you the proper background, and make it easier in general. Below is a home-made light-box.
 This is an old cardboard computer box with the top and one side cut out and is covered with "Sweat-shirt" material (using the 'fuzzy' least reflective side of the material). The box is 23" x 23" x 21" (a smaller one could be used, but try to keep it at least 24" high or higher - chins can jump over them). I used white sweat shirt material that was 60" wide and 3 yards long. Why so much material? This will allow you to rearrange it without having to wash it, just in case your chin decides to urinate on it during the shoot. Regular "T" pins or hat pins (about 12) can be used to hold the material in place and keep it from falling down or shifting. This is an old cardboard computer box with the top and one side cut out and is covered with "Sweat-shirt" material (using the 'fuzzy' least reflective side of the material). The box is 23" x 23" x 21" (a smaller one could be used, but try to keep it at least 24" high or higher - chins can jump over them). I used white sweat shirt material that was 60" wide and 3 yards long. Why so much material? This will allow you to rearrange it without having to wash it, just in case your chin decides to urinate on it during the shoot. Regular "T" pins or hat pins (about 12) can be used to hold the material in place and keep it from falling down or shifting.
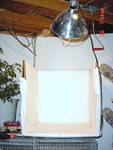 The light-box needs to be at eye level, with a light above and in front of the box. If you place the box on a kitchen or dining room table ... seat yourself in a chair to be about eye level with the box (one on rollers usually works best). Make sure the light is just about center, in front of and above the box so that there are no shadows inside the box on any side. Set this up ahead of time. The light-box needs to be at eye level, with a light above and in front of the box. If you place the box on a kitchen or dining room table ... seat yourself in a chair to be about eye level with the box (one on rollers usually works best). Make sure the light is just about center, in front of and above the box so that there are no shadows inside the box on any side. Set this up ahead of time.
Lighting:
As mentioned before, natural sunlight is the best. It will usually give you the best results.
Here are some results with other lighting:
 Florescent Lighting often leaves a yellow hue to your pictures. Florescent Lighting often leaves a yellow hue to your pictures.
 Halogen Lighting often leaves a blue hue to your pictures. Halogen Lighting often leaves a blue hue to your pictures.
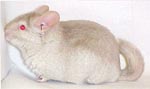
 Camera Flash used too close to the subject will 'wash it out'. Camera Flash used too close to the subject will 'wash it out'.
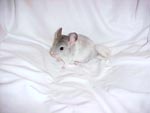
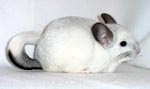 Good nose to tail shot with a proper 'Natural Lighting Bulb', but with a slight shadow on the right of the photo. Good nose to tail shot with a proper 'Natural Lighting Bulb', but with a slight shadow on the right of the photo.
 Good nose to tail shot with proper lighting, but messy fur. Good nose to tail shot with proper lighting, but messy fur.
 Proper lighting, but taken to far away. Proper lighting, but taken to far away.
 Out of focus ... a result of a most pictures taken to far away from the camera ... when a photo is cropped and made the proper size, anything that is just a little out of focus will show up much worse. Out of focus ... a result of a most pictures taken to far away from the camera ... when a photo is cropped and made the proper size, anything that is just a little out of focus will show up much worse.
Using your 'zoom' on your camera lowers the pixels or resolution of the photograph, giving you a lower quality photograph. On a digital camera, this will often make pictures look 'digital'.
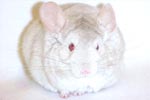
Most of these were done with a white chinchilla, because they are often the hardest to get the best shot of, but are good examples of the bad lighting practices and show the results of the same. All of these were taken with the same camera, only the lighting was different.
Choose a day when you have plenty of time ... chinchillas will not usually hold still for you and 'pose' for you. Allow yourself a minimum of 1 to 2 hours for the photo session. Take them during your chin's normal sleep time ... he/she will not be quite as energetic as they are during a normal 'play time'. Take you photos now! Do not procrastinate ... you may find that the pictures did not come out as you expected them to or that your chin was not as cooperative as you thought he/she was or that the store lost your film. Often, as it is with humans, you will find beautiful poses, with closed eyes, or blurry photos that you were 'sure' it was 'in focus', or a roll of bad film. Give yourself plenty of time for a second session or re-shoot!
Happy chinchilla photo shoot!
|
|
